
Configure an Export Definition - mParticle (Query)
The Loyalty platform integrates with the mParticle Customer Data Platform (CDP). You can export Members from Loyalty and transmit them directly via an API to mParticle for use in marketing campaigns and segmentation.
An Outbound mParticle Export Definition that uses Query as the Resource is an advanced option that lets you export Member and Event data using an analytic Query.
This article assumes that you have already created the Export Definition, either by creating it from scratch, or by copying an existing Export Definition.
To configure an Export Definition:
-
Select Admin from the top navigation bar, then select Integrations > Exports from the side navigation menu. The Exports screen is displayed.
-
On the Exports screen, search for the desired Export Definition (see
-
Click the name of the desired Export Definition. The Export Definition Details screen is displayed.
The Export Definition Details screen is split into multiple steps, identified by a series of numbered items across the top of the screen. You can complete these steps (described below) in any order you like. The Next button at the bottom of the screen navigates to the next step in the sequence, and the Back button navigates to the previous step.
Step 1: Query
For mParticle Export Definitions that use Query as the Resource, the export filter is controlled by an analytic Query that defines what records to export.
-
At the top of the Export Definition Details screen, click Filter.
-
From the Bigdata Query drop-down menu, select the desired query.
-
Click Save. Or click Next to move to the next step in the Export Definition screen.
Step 2: Map & Transform
The Map & Transform step is used to define the data map for the export file. The data map allows you to identify which Attributes to export, and how those Attributes should be named when sent to mParticle. The platform supports two methods for defining the data map: manually in the Map & Transform step, or use the output columns defined in the Query.
Manually Define a Data Map
To define the data map:
-
At the top of the Export Definition Details screen, click Map & Transform.
-
Click Add Row (or select Add Row from the Add drop-down menu).
-
From the Field Name drop-down menu, search for and select the desired Attribute.
-
Check Required if the Attribute is required.
-
Optionally, to perform a data transformation on an Attribute, click Add. From the pop-up menu of available options, click the desired Data Transformation. Repeat this step as needed to add additional Data Transformations.
-
From the Node drop-down menu, select the JSON node for this Attribute.
Note: The User Identity Node is reserved for the following identifiers: mpid, member_id, customer_id, email, mobile_phone, and mobile_number.
-
In the Destination field, enter the name of the Attribute as it should appear in the JSON payload.

-
Repeat the above steps to define additional Attributes to export. Optionally, to remove an Attribute, click the Delete icon next to it.
-
Click Save.
-
Click Next to move to the next step in the Export Definition screen.
Automatically Create the Data Map
To automatically create a data map based on the output columns in the selected Query:
-
At the top of the Export Definition Details screen, click Map & Transform.
-
Click Auto-Add Mappings (or select Auto-Add Mappings from the Add drop-down menu).
-
Optionally, if you need to manually add an Attribute beyond what was included in Query, select Add Row from the Add drop-down menu. The platform adds a new blank row to bottom of the screen, where you can select the Attribute and enter the name of the column. Optionally, to remove an Attribute, click the Delete icon next to it.
Please note the following logic when automatically creating the data map.
User Identities
The following three aliases will automatically be mapped as follows into the User Identity node of the JSON payload.
-
member_id or customer_id → mParticle Customer ID
-
email → mParticle Email
-
mobile_phone → mParticle mobileNumber
mParticle Batch-level Attribute
The following alias is automatically mapped as follows into the top-level of the JSON payload:
-
mpid → mParticle Batch mpid
Event Attributes
Any column name starting with “event_attribute.” will be mapped into the Event node of the JSON payload. In addition, the prefix will be removed to form the key. For example:
-
event_attribute.discount_event_amt → discount_event_amt
User Attributes
Any column name starting with “user_attribute.” will be mapped into the User Attributes node of the JSON payload. In addition, the prefix will be removed to form the key. For example:
user_attribute.address → address
Other Miscellaneous Attributes and Defaults
mparticle_event_name → mParticle Event Name (default is “User Sync Event")
mparticle_event_type → mParticle Event Type (default is “custom_event")
custom_event_type → custom event type
Any other alias not conforming to the above will be mapped to the User Attributes node.
The value for the environment attribute will automatically be populated by Loyalty, depending on which system (staging or production) the mParticle export is configured.
-
If in the staging system, "environment" is populated with "development"
-
If in the production system, "environment" is populated with "production"
If the system shows "environment" populated with "notset," please contact your Zeta Global team for assistance. .
Step 3: Preview
The Preview step lets you view a mockup of the JSON payload to be sent via API to mParticle.
Note: Before rendering the preview, you must first select a Connection Profile in the Destination step; see below for details.
-
At the top of the Export Definition Details screen, click Preview.
-
Click Generate Mock Payload. The platform generates and displays the JSON payload to be sent to mParticle.
Step 4: Destination
The Destination step is used to define the destination of the export file. This step requires that you have a Connection Profile defined. For more information on creating a Connection Profile, please see Connectors.
-
At the top of the Export Definition Details screen, click Destination.
-
From the Connection Profile drop-down menu, select a Connection Profile.
Step 5: Schedule
Export Definitions can be executed on-demand (see
In addition, you can create a schedule that executes the export once at a specified date / time, or on a recurring basis. These schedule options are described below.
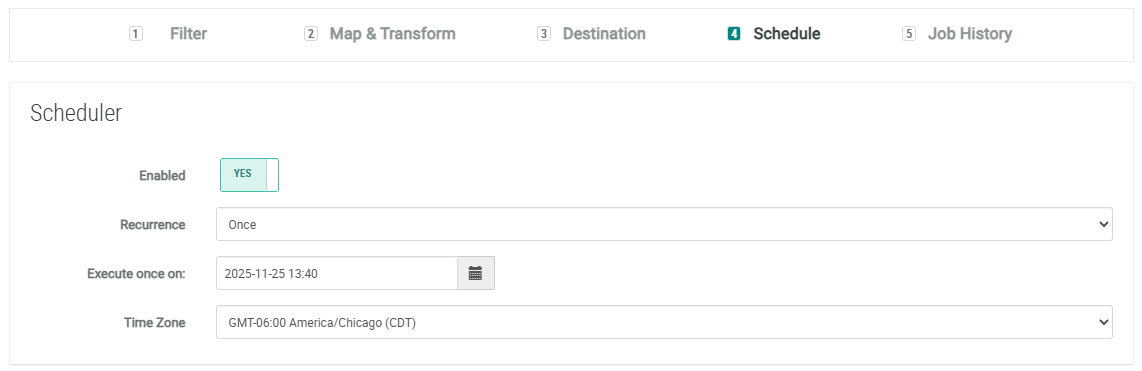
Execute Only Once
To schedule an Export Definition to execute once at a specified date / time:
-
At the top of the Export Definition Details screen, click Schedule.
-
Toggle Enabled to Yes.
-
From the Recurrence drop-down menu, select Once.
-
Click into the Execute Once On field. A calendar pop-up window is displayed. Select the desired date when you want the export to execute.
-
Within the calendar pop-up window, click the clock icon. Define the time when you want the export to execute.
-
From the Time Zone menu, select the time zone to use when determining the time to execute.
-
Click Save.
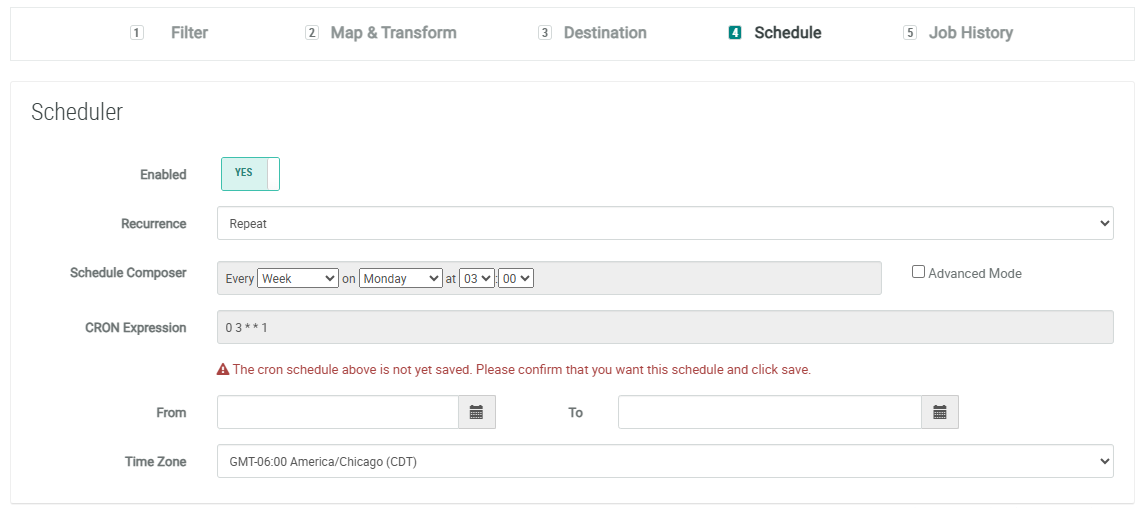
Executing on a Recurring Schedule
To schedule an Export Definition to execute on a recurring frequency:
-
At the top of the Export Definition Details screen, click Schedule.
-
Toggle Enabled to Yes.
-
From the Recurrence drop-down menu, select Repeat.
-
Next to Schedule Composer, select an interval:
-
15 Minutes
-
30 Minutes
-
Hour: Select the minute past the hour.
-
Day: Select the time of day.
-
Week: Select the day of the week, and the time of day.
-
Month: Select the day of the month, and the time of day.
-
Year: Select the day, the month, and the time of day.
-
-
As you configure the interval above, the CRON Expression field is automatically populated with the associated CRON expression. Optionally, to manually edit this expression, check Advanced Mode.
-
Optionally, using the From and To fields, define the export schedule begin and end date. If you leave these date fields blank, the schedule will run indefinitely.
-
From the Time Zone menu, select the time zone to use when determining the time to execute.
-
Click Save.
Email Notifications
You can configure the Export Definition to trigger success and / or failure notifications to one or more email recipients.
-
Optionally, if you want to send error notifications, toggle Error to Yes, then enter the email addresses for the notification recipients.
-
Optionally, if you want to send success notifications, toggle Success to Yes, then enter the email addresses for the notification recipients.
-
Click Save.

